Are you planning of starting your own online store? You’ve landed on the right page! Now, you could choose to begin your journey with platforms like Amazon or Flipkart ( like we did ), but we won’t be diving into that today. Let’s walk down the road less traveled, and build one ourselves. We will be writing a separate blog about starting on marketplaces soon.
My wife started her Fashion Jewelry venture (Tresneria) last year, and she started from Marketplaces. It has been going well, and she needed a boost to create awareness around her Brand. Hence, she asked me if we help her start an online store.
As the orders are starting to pick up, we got the biggest validation from Google
As we were about to start an online store, 2 of the most important considerations for me were
- Cost
- Speed
As you would notice from the image above, we passed the most dreaded website speed score from Google! Hence, I thought I should share our experience when we embarked on our journey to start an online store.
Disclaimer: I shall be shamelessly plugging in her products wherever its appropriate! Like the video below :)
Table of Contents
Choosing the Platform
When it comes where you have to start an online store, there are several paths to choose from. Self-hosted vs 3rd party stores is the most important decision you need to take when you start an online store.
Platforms like Shopify, Dukaan, and WooCommerce each have their unique perks. The first 2 are 3rd party stores, while woocommerce is self-hosted store.
So what exactly is WooCommerce?
If you to start an online store, chances are, you already know about Shopify and Dukaan. But what exactly is woocommerce & WordPress?
Imagine WordPress as a smartphone. It’s a powerful tool right out of the box, but its real potential is unlocked by the apps that you install on it. Each app serves a unique function, adding to the overall functionality of the smartphone. Whether it’s messaging, photography, or games – each app contributes to making your smartphone experience better and more personalized.
In the same way, WordPress is a robust platform that allows you to create and manage a website. Out of the box, it’s a great tool, but its real strength lies in its flexibility and the ability to extend its functionality through plugins. Want a blog or start an online store? WordPress and the plugins have you covered!
Think of plugins as the ‘apps’ for your WordPress ‘smartphone’. Just as you download apps on your phone to expand its capabilities, you can install plugins on your WordPress site to add new features and functionality.
WooCommerce is one such ‘app’ or plugin for your WordPress site. It’s a free eCommerce plugin that allows you to turn your WordPress website into a fully functional online store. It is the ultimate solution if you plan to start an online store. It enables you to sell products and services directly from your website, manage inventory, handle shipping, and even collect payments.
Dukaan vs Shopify vs WooCommerce
| Features | Dukaan | Shopify | WooCommerce |
|---|---|---|---|
| Platforms Supported | Windows, Mac, Linux, SaaS/Web, On-Premise, iPhone, iPad, Android, Chromebook | Windows, Mac, Linux, SaaS/Web, On-Premise, iPhone, iPad, Android, Chromebook | Windows, Mac, Linux, SaaS/Web, On-Premise, iPhone, iPad, Android, Chromebook |
| Target Audience | eCommerce businesses and merchants in need of a solution to start, run and grow their online business | Shopify offers plans for small to mid-sized businesses as well as enterprise companies | Small or mid-sized to large eCommerce companies seeking a tool to manage their sales |
| Support | Business Hours, 24/7 Live Support, Online | Business Hours, 24/7 Live Support, Online | Business Hours, 24/7 Live Support, Online |
| API | Offers API | Offers API | Offers API |
| Pricing | Starting $69 per year, commission / sale | $24 per month, commission / sale | Free, with official paid plugins |
| Reviews/ Ratings | Overall: 5.0/5, Ease: 5.0/5, Features: 4.0/5, Design: 5.0/5, Support: 4.0/5 | Overall: 4.8/5, Ease: 4.7/5, Features: 4.5/5, Design: 4.8/5, Support: 4.9/5 | Overall: 5.0/5, Ease: 4.7/5, Features: 5.0/5, Design: 5.0/5, Support: 4.4/5 |
| Training | Documentation, Webinars, Live Online, In Person | Documentation, Webinars, Live Online, In Person | Documentation, Webinars, Live Online, In Person |
So woocommerce is
- Free
- Open Source
- Can have its functionality extended by getting plugins for woocommerce ( free or paid )
Hence, I decided to go with Woocommerce to start an online store for my wife. Let’s jump right into it.
Theme Selection for WordPress and Woocommerce

Selecting a theme when you start an online store, is probably the most crucial step in your journey. Continuing our smartphone analogy, consider how different apps on your phone come with their unique user interface (UI) and user experience (UX) design. Each app has a distinctive look, feel, and way of interacting, which is pre-designed and provided by the app creators.
Similarly, WordPress themes come with predefined UI and UX designs. When you choose a theme, you’re also choosing a specific look and feel for your website, as well as a way for your visitors to interact with your site. This includes the site’s layout, color scheme, typography, menu styles, button designs, and more.
The beauty of this is that you don’t need to be a professional designer or spend a lot of money on design. Good themes are designed by professionals who understand the principles of good web design and usability. So, by choosing a well-designed theme, you’re leveraging their expertise to provide a great experience for your visitors.
This makes themes a powerful tool for creating attractive, user-friendly websites without needing to understand coding or design. You can simply browse through different themes, preview how they look, and choose one that aligns with your vision for your website. There are some amazing themes perfect if you want to start an online store.
We selected QWERY WordPress theme, here’s why
- Predefined UI and UX: Everything you see on the demo of the Qwery theme is available in the actual theme, meaning that you can create a website that looks exactly like the demo with minimal effort
- Amazing Effects and Transitions: The theme comes with predefined scrolling animations, background blobs, image hovers, and other captivating effects that enhance the user experience and make your website stand out
- Unique Woocommerce Integration: Most importantly, the theme had almost the exact UX I wanted for our customers, with some pretty unique layouts. This was the perfect fit to start an online store for ourself.
All good till now, but how and where to host your store?


Just as a shop needs a physical space to operate, as you start an online store, it needs a virtual one. This is where hosting comes into the picture. You can host your website on your own, or you can use a 3rd party provider for hosting your website
Before you decide hosting as you start an online store, let’s weigh the pros and cons of third-party hosting versus self-hosting
| Third-Party Hosting | Self-Hosting | |
|---|---|---|
| Pros | • Easy to set up | • Full control over server resources |
| • Maintenance and updates handled by provider | • Potentially more cost-effective for large sites | |
| • Often includes additional services (e.g., backups, security) | • Can customize to meet specific needs | |
| • Scalability is often easier | • No limitations on data storage or transfer (dependent on hardware) | |
| Cons | • Monthly or annual costs can add up | • Requires technical knowledge to set up and manage |
| • Limited customization options | • Maintenance and security updates need to be handled in-house | |
| • Potential limitations on data storage or transfer | • Potential high upfront costs for server hardware and software | |
| • Your site is impacted if the hosting provider experiences downtime | • Scalability can be more difficult and expensive |
Self-hosting can provide an online store tailored specifically to your business needs.
anonymous
To start an online store that can scale, it was important for me to make sure there is the least possible dependence on 3rd party, within manageable costs. Hence, self-hosting was a no-brainer for me. Let’s dive into how you can self-host WordPress, with some specific details
How to self host while you start an online store?
At the very high level, it involves two steps
- Get a VPS ( virtual Machine ) from any cloud infra provider like AWS/ Azure/ GCP
- Install WordPress on that VPS.
But as previously stated, the key consideration here is to ensure that the costs remain within a reasonable range at all times as I help my wife start an online store. So I decided to one-up. I decided to install a docker on my virtual machine.
Now instead of the host OS, my docker will host the WordPress. Advantage? I can now run multiple websites on the same Virtual machine
So what exactly is Docker?

Docker is like a moving truck that helps you when you’re relocating your business. Think of WordPress as your business inventory. You can neatly store all your inventory (WordPress) in a box (Docker) and transport it to your new shop (Virtual Machine). This way, your business inventory is ready to use, no matter what shop you move it to.
Additionally, you can load different sets of inventory into different boxes (run multiple WordPress sites), and all of them can be delivered to the same shop (your Virtual Machine). This way, you can efficiently use your new shop’s space without having to rent multiple shops.
Cool, now let me give you either specific instructions or references which will help you start an online store, hosted in your own environment.
Step-by-step process for self-hosting your onsite store
- Get a Linux VPS from AWS/ Azure / GCP. In this example, I shall use Azure. The video below covers how to do it in dept
- Awesome, now you have a virtual Machine. We need to install and configure Docker and Nginx on the machine, so let’s get started
Before installing Docker & Nginx, you should update your current list of packages:
sudo apt-get updateNext, you can install a few prerequisite packages which let apt use packages over HTTPS:
sudo apt-get install apt-transport-https ca-certificates curl software-properties-commonThen, you’ll add the GPG key for the official Docker repository to your system:
curl -fsSL https://download.docker.com/linux/ubuntu/gpg | sudo apt-key add -Add the Docker repository to APT sources:
sudo add-apt-repository "deb [arch=amd64] https://download.docker.com/linux/ubuntu $(lsb_release -cs) stable"Next, update the package database with the Docker packages from the newly added repo:
sudo apt-get updateFinally, you can install Docker:
sudo apt-get install docker-ceCheck the status of the installed docker
sudo systemctl status dockerNow Let’s install Nginx
sudo apt-get install nginxOnce the installation is complete, start Nginx:
sudo service nginx startSetting Up WordPress with Docker and Nginx
Docker Configuration
For our setup as start an online store, we will use Docker to run a MySQL database and a WordPress instance. We’ll define our Docker setup using a docker-compose.yml file, which allows us to define and run multi-container Docker applications. Here’s a sample configuration:
version: '3.3'

services:
   db:
     image: mysql:5.7
     volumes:
       - db_data:/var/lib/mysql
     restart: always
     environment:
       MYSQL_ROOT_PASSWORD: <set sql root password here>
       MYSQL_DATABASE: <set sql DB here>
       MYSQL_USER: <set sql user here>
       MYSQL_PASSWORD: <set sql password here>
   wp:
     depends_on:
       - db
     image: wordpress:latest
     ports:
       - "<port number on which you want to bind / run the docker>:80"
     restart: always
     environment:
       WORDPRESS_DB_HOST: db:3306
       WORDPRESS_DB_USER: <your db username you want>
       WORDPRESS_DB_PASSWORD: <your db password you want>
       WORDPRESS_DB_NAME: <your db name you want>
       WORDPRESS_DB_TABLE_PREFIX: <any prefix to DB name, can be anything>
     volumes:
       - wp_data:/var/www/html
volumes:
    wp_data:
    db_data:
In this docker-compose.yml file, we define two services: db and wp. The db service uses the mysql:5.7 image, and the wp service uses the wordpress:latest image. The depends_on option under the wp service ensures that the db service is started first. The restart: always option ensures that the services are always restarted if they stop.
The “ports” defines on which port would the Docker run.
The environment variables under each service are used to configure the database and WordPress instance. Be sure to replace the placeholder text (e.g., <set sql root password here>) with your own information.
The volumes option is used to persist data across container restarts and shutdowns. The db_data volume is mapped to /var/lib/mysql inside the db container, and the wp_data volume is mapped to /var/www/html inside the wp container.
Nginx Configuration
Now that Nginx is installed, we need to configure it to reference the docker volume we created above on post 8048.
After installing Nginx, open the Nginx configuration file
vi /etc/nginx/nginx.confGo to the section which says “Virtual Host Configs”, and below is, we will create a new host, our website
server {
    #listen 8048 default_server;
    #listen [::]:8048 default_server;

    root /var/lib/docker/volumes/your_wp_data/_data;
    index index.php;
    server_name yourdomain.com;

    # Rocket-Nginx configuration
    #include rocket-nginx/conf.d/default.conf;
    # Remove or comment out access_log and error_log paths to avoid revealing file locations

    proxy_force_ranges on;
    underscores_in_headers on;

    location / {
        proxy_pass http://your_backend_server;
    }
}
 upstream sia-cluster {
                server 127.0.0.1:<port number of docker container running the wordpress>;
}- root: The
rootdirective specifies the root directory for your website files. In this case, it points to/var/lib/docker/volumes/your_wp_data/_data, which is the location where your WordPress files are stored. You will get this path from the docker file you created in the above step - server_name: The
server_namedirective specifies the domain name for your website. In this example, it is set toyourdomain.com. - proxy_pass: The
proxy_passthe directive is used for reverse proxying requests. It forwards requests coming to Nginx to the backend server specified byhttp://your_backend_server. This enables Nginx to act as an intermediary between the client and the backend server, handling incoming requests.
The final step is to conclude our setup to start an online store
We now have WordPress running in docker, and Nginx configured. But how would a user land on my website / online store?
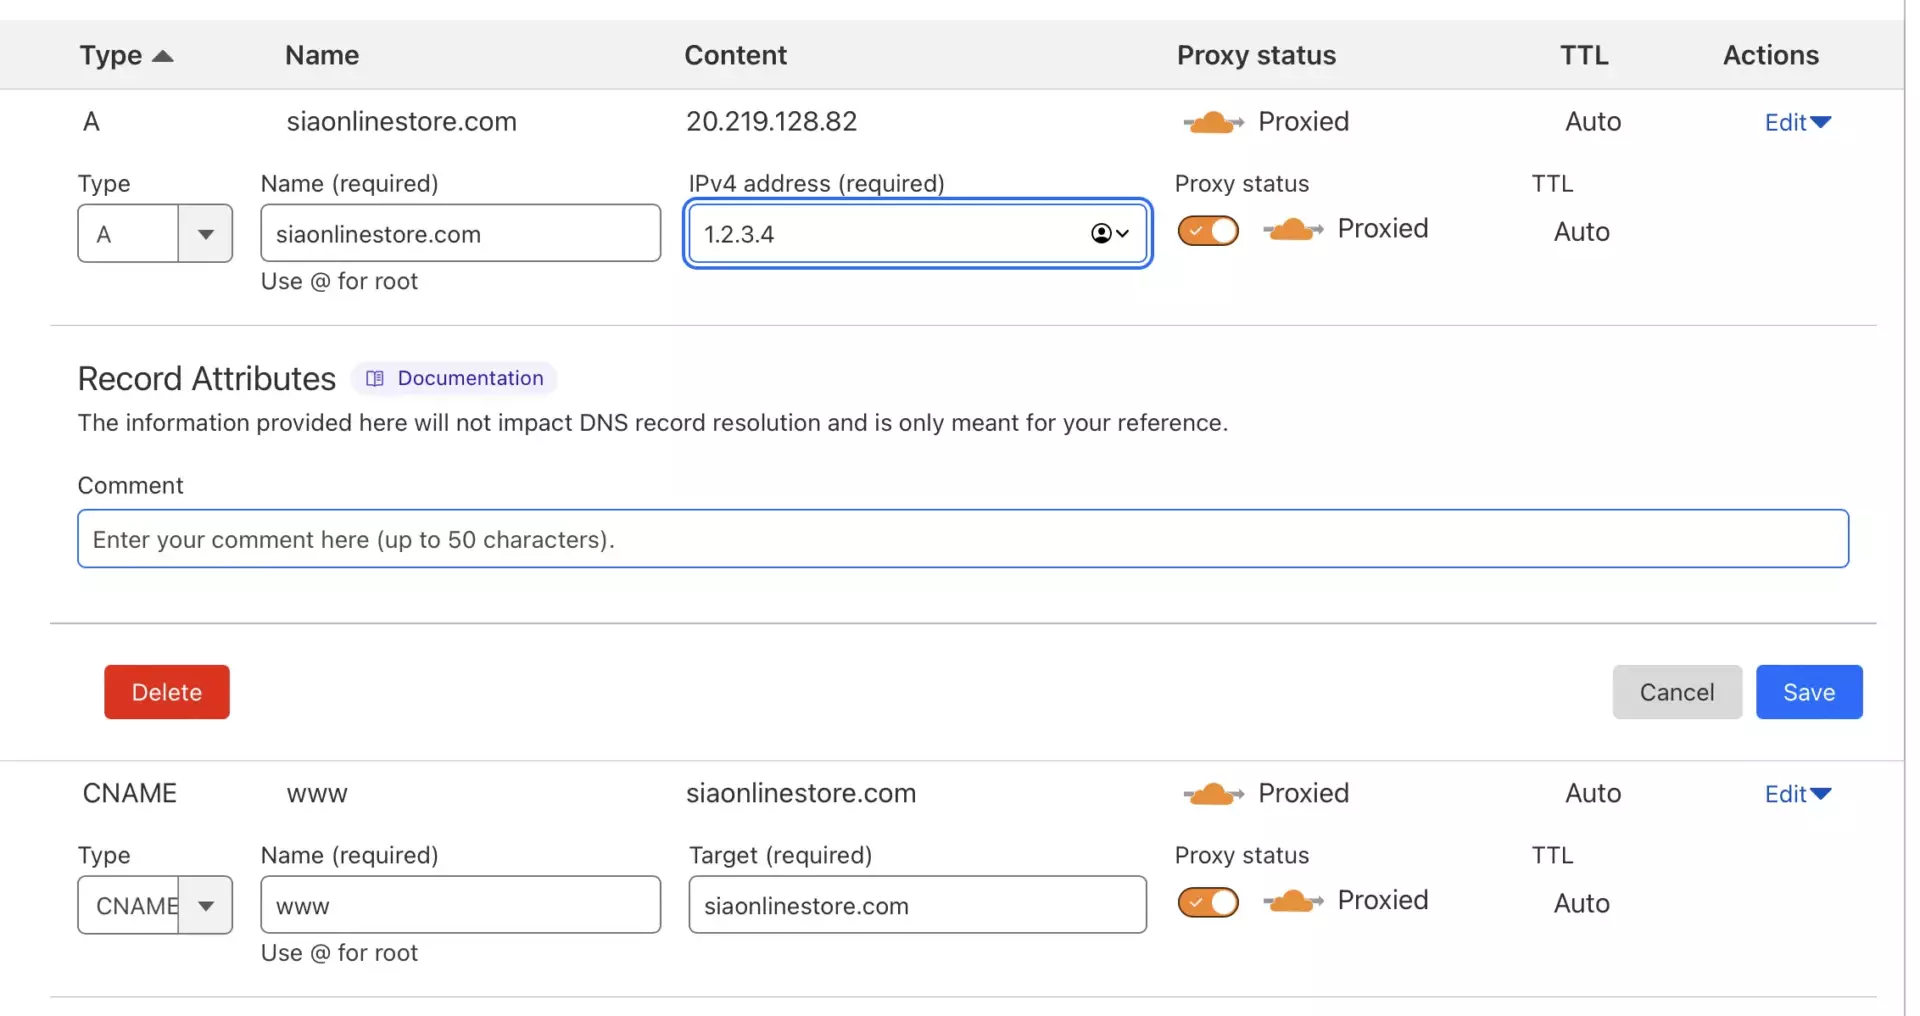
For that, all we need to do is set up our Domain name referenced in the image below

So here is a breakdown.
- We tell our DNS server, that when someone hits the domain name “siaonlinestore.com”, redirect them to I.P address “1.2.3.4” ( which is the I.P address of our virtual machine)
- Through our Nginx configuration, we tell our server, that whenever our server receives a request for the name siaonlinestore.com, it should be redirected to the port we defined.
- On that port, we have docker running with WordPress.
And that’s it, you now have a functional WordPress docker instance running, behind Nginx, helping you achieve your goal to start an online store.
So we have to answer how to start an online business. But what about user experience in terms of speed and responsiveness? If the speed is slow, there just isn’t much point to start an online store anyways.
Start an Online Store: The Need for Speed
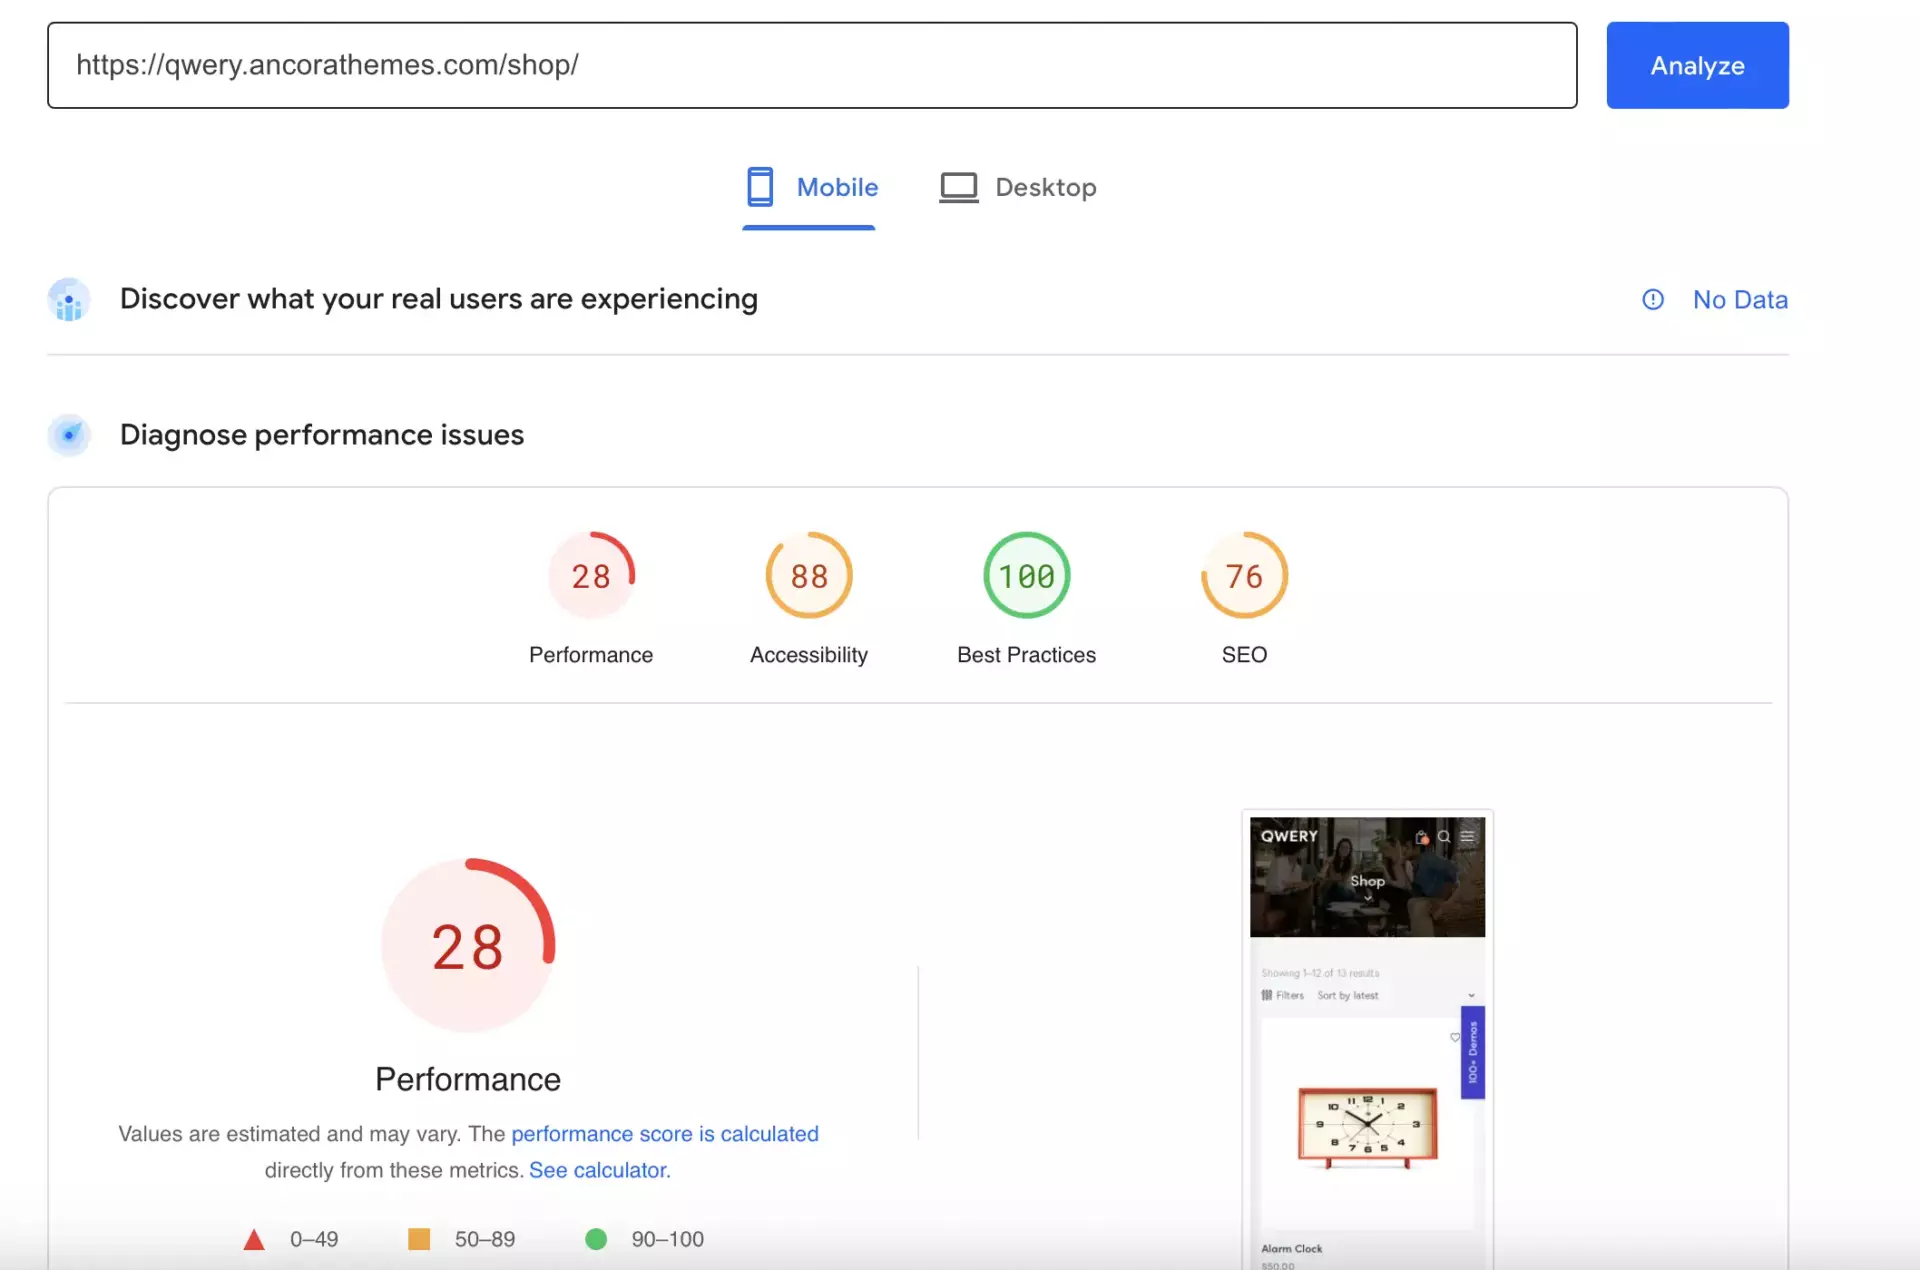
Below is the speed test result of the theme we selected, without any optimizations
When you start an online store, speed is a crucial factor. A slow-loading website can make potential customers leave before they’ve even seen your products. So how can you ensure your site is speedy and efficient? Let’s discuss three key tools you can use: Asset Cleanup Manager, WP Rocket, Cloudflare APO/caching, and Argo.
Digging Deeper: Asset Cleanup Manager Plugin

To really understand how the Asset Cleanup Manager plugin can speed up your online store, we need to talk about JS (JavaScript) and CSS (Cascading Style Sheets). Don’t worry – it’s not as technical as it sounds!
What are JS and CSS?
Think of JS and CSS as the building blocks of your online store. JS is a programming language that makes your website interactive. For example, it powers things like the drop-down menus and the pop-up images that appear when you hover over a product.
On the other hand, CSS is responsible for the look and feel of your website. It determines the colors, fonts, and layout of your online store. It’s like the paint and decor in a brick-and-mortar shop.
How does Asset Cleanup Manager help?
Now, when someone visits a page on your online store, their browser needs to load all the JS and CSS files for that page. But not all pages need every single JS and CSS file.
Let’s say you have a “Contact Us” page on your online store. This page might not need the JS file that powers the image zoom feature on your product pages. Loading this JS file is like bringing a bicycle to a boat race – it’s not necessary and just slows things down.
That’s where the Asset Cleanup Manager plugin comes in. It lets you ‘unload’ or stop certain JS and CSS files from loading on specific pages. Using our example, you could tell Asset Cleanup Manager not to load the image zoom JS file on your “Contact Us” page. This means the page will load faster, as there’s less for the customer’s browser to download and process.
Boosting Your Store’s Performance: WP Rocket

When you’re ready to start an online store, one of your top priorities should be to ensure that your website loads quickly and smoothly. This is where WP Rocket comes into play, providing key optimizations like removing unused CSS and delaying JavaScript loading.
What is CSS and why remove unused parts of it?
CSS, or Cascading Style Sheets, is like the fashion stylist of your online store. It controls the colors, fonts, and layout of your site, giving it its unique look and feel. However, not every page of your store uses all the styles defined in your CSS files.
Imagine you’re packing for a vacation. You wouldn’t pack your entire wardrobe, would you? You’d only take the clothes appropriate for your destination. Similarly, WP Rocket ‘packs’ only the necessary CSS for each page of your store, removing any unused CSS. This makes your pages lighter and quicker to load, improving your customers’ shopping experience.
What is JavaScript and why delay its loading?
JavaScript, or JS, makes your online store interactive. It’s like the store assistant that helps customers navigate your site, enabling features like drop-down menus and pop-up images.
Now, not all JavaScript is needed right when a page loads. Going back to our store assistant analogy, you wouldn’t want all the store assistants rushing to the door as soon as a customer walks in. Instead, you’d want them to help out as and when needed.
That’s exactly what WP Rocket does with its Delay JavaScript Execution feature. It delays the loading of JavaScript until it’s actually needed. This means the basic content of your page loads faster, so your customers can start browsing your products sooner, making your journey to start an online store a fulfilling one!
Why are these features important when you start an online store?
Speed is key in the online shopping experience. The faster your site loads, the happier your customers will be. By removing unused CSS and delaying JavaScript, WP Rocket makes your online store more efficient and customer-friendly. It ensures that your customers spend less time waiting for pages to load and more time exploring and purchasing your products.
Cloudflare APO/Caching and Argo
Finally, we have Cloudflare’s APO, caching, and Argo services. Imagine if you had a fleet of delivery trucks ready to deliver your products to customers all over the world. That’s what Cloudflare does for your online store’s data. It stores copies of your website on servers worldwide, meaning your customers can access your store quickly, no matter where they are. Cloudflare’s APO and caching services store and deliver your website’s information swiftly, while Argo uses the fastest routes to deliver this data to your customers. This makes Cloudflare an invaluable tool for anyone looking to start an online store.
Conclusion: Control, Cost, and Speed to Start an Online Store
When you decide to start an online store, you’re taking charge of your entrepreneurial journey. This journey is more than just setting up a website and listing your products. It involves making strategic decisions that influence your online business’s success. Choosing to self-host your online store is one such crucial decision. Self-hosting gives you unparalleled control over your website, allowing you to customize every detail to align with your business needs and customer expectations. Plus, it’s a cost-effective choice, especially when budgeting is vital as you start an online store.
But control and cost are just part of the equation as you start an online store. Speed is an indispensable ingredient in the recipe when you start an online store. A quick-loading website not only enhances your customers’ shopping experience but can also elevate your search engine rankings. Tools like the Asset Cleanup Manager and WP Rocket, along with Cloudflare’s services, can significantly boost your online store’s speed.
In conclusion, remember that control, cost, and speed are the trifecta for success when you start an online store. By keeping these factors in mind, you can start an online store that’s fast, cost-effective, and fully under your control. Embrace these elements, and you’ll be well on your way to creating an online store that stands out in the competitive online marketplace.
[ays_poll id=1]


